
Build a Marketing Campaign Simulator in Three Easy Steps, Without Coding
By Ben Udell, Contributor at The Financial Brand
Simple Subscribe
Subscribe Now!
“Vibe coding” may sound unfamiliar and challenging, but it’s far more accessible than it seems. The fastest way to understand it is to try it. So, instead of explaining the concept, let’s build something together: We’re going to take a tool every banker already has, an Excel spreadsheet, and turn it into an interactive application you can use in a real meeting.
No coding experience required.
If you haven’t read Part 1, start there for a quick foundation. In this follow-up, we’ll build a checking campaign simulator that helps you model marketing strategies, compare scenarios, engage stakeholders, and think more critically about acquisition decisions.
This is what makes using AI to code so powerful. Instead of hiring a developer or waiting on internal resources, we’re going to take something that already exists and make it significantly more useful.
Bottom line: Not long ago, this type of project could take weeks or months, require a meaningful budget, and involve hours of back-and-forth translating banking concepts to technical teams. You can build this in about an hour for less than $25.
Nearly every bank and credit union has a strategic priority to grow checking accounts, yet very few teams have a strong way to model and evaluate their options. At best, there’s a basic spreadsheet. More often, there’s no structured model at all. Converting that spreadsheet into a web-based tool changes the experience. It improves usability, makes scenarios easier to understand, introduces visual insights, and creates something you can confidently use in a marketing discussion or boardroom setting.
That’s what makes this example so valuable. You’re building a calculator and a decision-making tool. And once you see how quickly you can go from idea to working application, you’ll start to realize how many other opportunities are sitting in your organization right now.
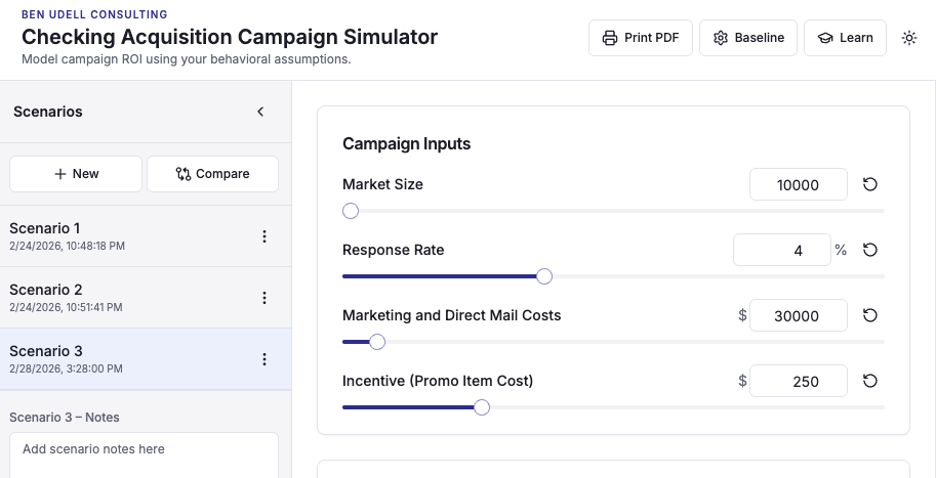
The final product, Checking Campaign Simulator, can be found here: https://vibecodingforbankers.com/. Of course, this site was also built with vibe coding. Set up your vibe coding account and let’s start building.
Step 1: Define What You Want to Build
Before you jump into building, take a moment to define what you want to create. Yes, you can jump straight into vibe coding and start a back-and-forth conversation with your tool. It will build, adjust, and evolve in real time. Starting fast is a great option when you want to explore ideas. But planning first gets you closer to what you actually want more quickly.
If you have a clear outcome in mind, start with a simple Product Requirement Document (PRD). This is not technical. It’s just a structured way to organize your thinking and give your AI tool a strong starting point. Think of it this way: if you were explaining this calculator to a colleague, what would you say?
You’d likely cover:
- What the tool is trying to accomplish
- What inputs the user needs to provide
- What actions or calculations should happen
- What the experience should look like
- Any branding elements or contact details
- What outputs are needed, such as summaries, PDFs, or exports
That’s your PRD, and GenAI makes this even easier. Instead of starting from scratch use the power of GenAI to build and refine your idea.
Prompt: “I need your help building a PRD for Lovable.dev. I am building a website [describe your idea in detail]. Review my plan, offer suggestions, and provide guidance.”
From there, treat the interaction like a working session. Review the output, make edits, answer follow-up questions, and push the tool to improve the plan. This is where being human-in-the-loop matters. You’re not just accepting answers, you’re shaping the solution as though you were talking directly to a software developer.
Once you’ve iterated, you can consolidate everything into a more structured plan:
Prompt: “Take everything we’ve discussed and create a highly detailed PRD.”
Reality check: A PRD is not required. You can start with a single sentence and build from there. That’s what makes vibe coding accessible to everyone. But for most people, especially without a technical background, this step dramatically improves the outcome by creating direction and vision for a final product.
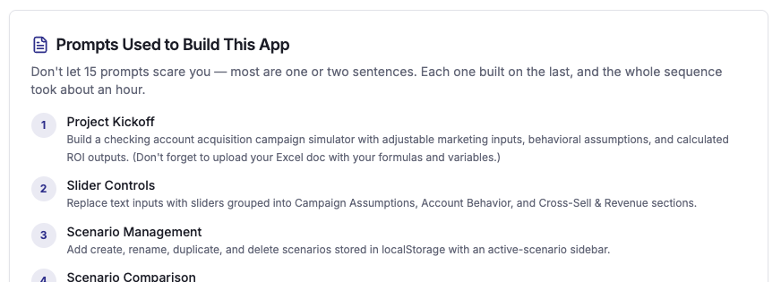
For the Checking Campaign Simulator, I intentionally skipped a formal PRD and started with a simple prompt, then iterated from there. You can see that entire progression in the “Learn” button within the simulator. It includes the outline of the prompt log, which you can copy, paste, adapt, or expand to jump start your own build.
Step 2: Start Building
With your PRD complete, or even just a basic idea, you’re ready to move into the build process. In this example, I’m using Lovable.dev by typing my requests into its chat window. All of my interaction is in natural language, I’m not using any coding language. I’m a traditional banker and I don’t know any coding language.
To build the Checking Campaign Simulator I started with this prompt:
Prompt: “Build a checking account acquisition campaign simulator with adjustable marketing inputs, behavioral assumptions, and calculated ROI outputs.” (Don’t forget to upload your Excel doc with your formulas and variables.)
(The Checking Campaign Simulator in vibecodingforbankers.com includes an Excel spreadsheet you can use to help you build this site.)
I gave Lovable.dev specific, but basic, instructions to improve my project. My instructions were straightforward, clear, and easy to replicate.
Prompt: Yes, do that and let’s give it a separate tab. This is a learning app so I want users to see what I did so they can replicate it. I also want to add the spreadsheet to that tab so they can download the excel doc. Let’s call the tab, “Learn How to Build This Site.” Include instructions on how to pull the .txt file, give guidance on how to use natural language to prompt and anything else you think would be helpful.
Your first prompt won’t create a final project. You’ll establish a working foundation and improve it through direction and feedback, just like you’re talking to a human software developer. Always fact check and test your projects. In this example, because I’m using an Excel spreadsheet, I can test outputs side by side.
After this first prompt I tested my solution and made updates. I used prompts like:
- Replace text inputs with sliders…
- Add a Print PDF button…
- Add a cumulative profit chart…
- Make the app mobile responsive…
- Size the app to better fit on a mobile device…
- Add a Learn button to help users build their own version…
The result is a fully functional website built in under an hour with minimal prompting. If you jump right in, each of those prompts could be individual requests as you build in small steps. With a PRD, you could build all those prompts into your starting document. Both work. What makes vibe coding amazing is the ability to rapidly test and deploy ideas. Once I built a working model and tested it, I was ready to enhance it.
Prompt: “Now create the ability to save scenarios for comparison. Create a vertical toolbar on the left side that allows me to save, delete, and rename each scenario so I can compare them. Then build the ability to compare up to three scenarios. The comparison update is a separate page that you’ll show a side-by-side comparison, graphs and charts showing performance metrics. Create an AI generated summary that compares and contrasts each scenario with data, details, and insights. This page should be exportable by PDF.”
Prompting can be as simple as a color code change or a long detailed next step. Your ability to describe what you want to accomplish will determine how well the tool builds to your expectations. In literally one prompt, if there are clear outcomes detailed, you can build a first draft of your calculator, website, app, or tool. It’s that easy to jump into vibe coding.
Helpful Tips
Start simple: Build one page, get it working, then expand. Don’t try to design the entire solution upfront. Vibe coding works best when you layer functionality over time. Use the AI inside your tool, along with external GenAI tools, as active collaborators. If something isn’t clear, or you’re unsure what to do next, ask. The tool can guide you just as much as it can build for you.
Design support: One common critique of vibe coding is that designs can feel generic. That’s usually a prompting issue, not a platform limitation. You can significantly improve design quality by being specific. Bring in your brand elements, reference sites you like, and push the tool to replicate a certain look and feel.
Prompt: “Review this website [include the link] and do a deep dive on the design choices, brand colors, layout, and features. I want to replicate this in my design. Give me a highly detailed guide I can give to my web developer.”
Test everything: It’s easy to underestimate how complex even a simple web app can be. Don’t assume it works. Trust but verify. Test your inputs, outputs, formulas, links, and mobile experience. In this example, using Excel as a baseline makes it easier to confirm accuracy. Treat testing as part of the build process, not something you do at the end.
Prompt: “Review my formulas and how you create the output and give me a detailed guide to ensure it’s working to my expectations.”
Push your creativity: These tools are far more capable than most people initially realize. The limitation is rarely the technology, it’s how far you’re willing to push it and what ideas you can create for your personal needs.
Prompt: “When you generate the comparison, also generate an executive summary that is approximately three paragraphs long and highlights pros and cons of each scenario and what we should think critically about when making a decision.”
Interact with your tool: Use your tool as a partner. This means you’ll ask for ideas, provide direction, and ask for clarification just like you’re talking to a designer or software developer.
Prompt: “I don’t understand what you’re telling me, I’m not a coder. Explain it.”
Throughout this process you’re using these tools and GenAI to build, think, test, and refine. Once you get comfortable with that loop, creating useful tools becomes significantly more accessible and faster to build.
Step 3: Publish and Share Your Tool
Once your calculator or website is working the way you expect, the next step is to publish it. One of the advantages of building on a platform like Lovable.dev is that publishing is straightforward. You can generate a live version of your site almost immediately and decide if you keep it public or private.
Prompt: “I’ve built this website and want to embed it into SharePoint. Help me do that.”
If this is something you plan to use personally, or within a small team, a shared link may work. This allows you to test the tool in real conversations, walk through scenarios, and validate that it performs the way you expect when others interact with it. There are many easy to create and helpful tools that have no privacy issues.
Before sharing take a final pass through your build:
- Confirm all calculations match your reference model
- Test inputs across a range of scenarios
- Ensure formatting is consistent and professional
- Verify that no data is being stored or retained unless designed to do so
If you shared what you built in a meeting, would you trust that every link and calculation is accurate.
If your goal is to publish publicly, allow for personally identifiable information, or your work interacts with customers or members, test thoroughly and align with your risk management policies and IT Usage Policy. You may want to have a professional developer review and rebuild the solution to ensure you have proper compliance. If you do, you’ve already jumpstarted the process, saving time and resources.
Wrapping It Up
At this point, you’re in a position to do something most bankers haven’t considered possible. You can take a concept that likely lived in a spreadsheet, functional but limited, and turn it into an interactive tool you can use in real conversations. Something you can explain, demonstrate, and refine without relying on a developer or waiting in a queue.
That shift matters. For banks and credit unions focused on innovation and efficiency, this creates a new path to build tools that directly support employees, customers, and members. It’s important to involve the right stakeholders to ensure alignment with risk, compliance, and internal policies. New technology is often easy to dismiss. But when it drives measurable operational improvement, and in many cases meaningful financial impact, it becomes much harder to ignore. Add in gains in productivity, clarity, and user experience, and the case becomes even stronger.
This example can be built in one to two hours, depending on how clearly you define your vision and how you guide the tool through iteration. That’s the real advantage. You can move from idea to working solution quickly, test it, improve it, and put it into use without the traditional constraints of time, cost, or technical dependency.
Think of this as a starting point. Once you understand how to move from idea to build to refine to share, you’ll begin to see opportunities across your organization. Start small. Build something useful. Improve it. Then build the next thing.
That’s how innovation becomes repeatable. And that’s how it starts to scale.


